
History, techniques, materials, costs – everything a goalie or hockey fan needs to know about the craft of custom mask art.
Among all the gear a hockey player wears, the goalie mask is the one piece that carries a real personality. It’s the only equipment that doubles as a statement, worn in front of thousands of fans and carrying signals of loyalty, tribute, or pure creative ambition. The painted goalie mask is one of the most distinctive traditions in professional sport, and it exists at every level of the game, from NHL starters to Saturday beer-league goalies.
Whatever brings you here, let’s walk through the full picture: where the tradition started, how the airbrush process works, what it costs today, and what separates a good airbrush artist from a great one.
The goalie mask started as pure protection. On November 1, 1959, Jacques Plante refused to go back on the ice after a backhand shot opened a cut on his face, unless his coach let him wear the fibreglass mask he’d been developing in practice. Toe Blake agreed reluctantly, the Canadiens won, and hockey changed.
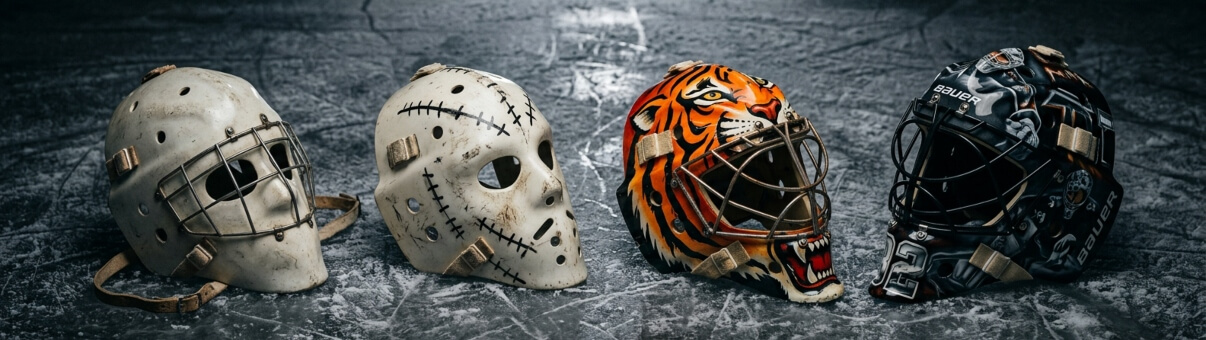
For the next eight years, masks stayed plain and functional. The first personality appeared by accident in 1967, when Gerry Cheevers took a shot off his mask in practice and had trainer John Forristall draw a stitch mark where it hit. They kept adding one every time another shot connected. By the end of his career, we all know what that mask looked like: black stitches everywhere, one of the most recognized images in the sport. What started as a joke became a tradition the whole position eventually adopted.
Colour came next. Doug Favell of the Philadelphia Flyers had his mask painted bright orange for a Halloween game in 1970, and shooters told him it caught their eye before anything else did. By the mid-1970s, Ken Dryden’s target mask and Gilles Gratton’s tiger face with the Rangers (you can see it today at the Hockey Hall of Fame) showed the mask had become a form of identity. Gary Bromley’s skull with Vancouver in 1980 made clear there were no real limits.
Today, the tradition runs at every level. Jacob Markstrom once said his first painted mask, at age eleven, had Bart and Homer Simpson on it. That detail tells you everything about what these masks mean to goalies long before they turn pro.
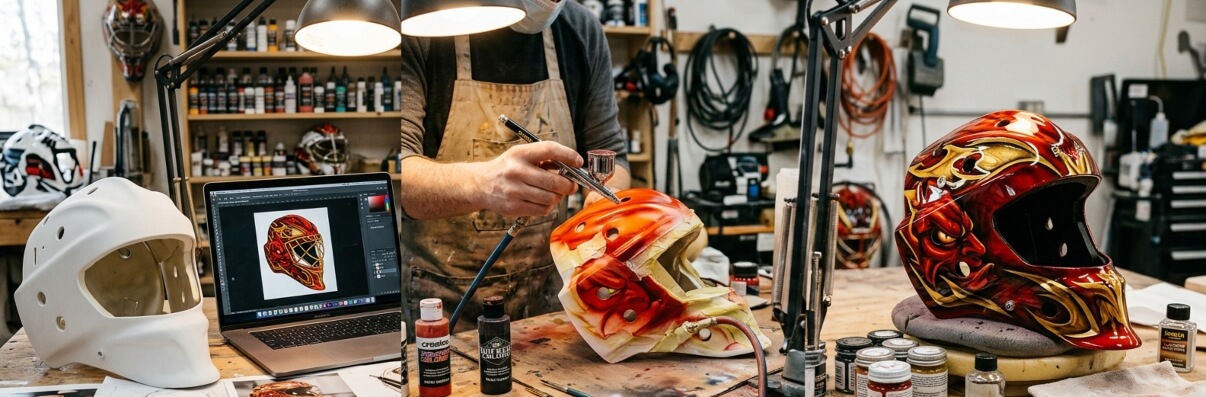
Modern goalie mask art is built around the airbrush, a small hand-held tool that uses compressed air to atomize paint into a fine spray. Unlike a standard brush, it can produce smooth gradients, sharp edges, photorealistic portrait work, and subtle texture that hand-painting simply cannot match. The core skills take months to develop, and the gap between beginner and professional results is wide.
The main techniques used by working mask artists include:
Tip for first-time painters
Practice on a broken or discarded mask before touching a new shell. Sanding off all surface gloss and applying a proper primer coat before any paint are non-negotiable steps. Skipping either one is the most common reason an amateur paint job chips or peels within a season.
We’ve broken this down by stage, since each part of the process affects the next.
Modern goalie masks are built from fibreglass, carbon fibre, Kevlar, or combinations of all three. Before painting begins, the shell is stripped completely: cage, straps, back plate, and padding all come off. Cracks or surface damage are repaired at this stage, so the finished paint goes onto a solid, uniform base.
The shell gets sanded, typically with 600-grit paper, to remove all surface gloss and give the primer something to grip. After sanding, it’s cleaned with a degreaser or glass cleaner to remove any oils left by handling. This step matters more than most beginners expect. A mask that wasn’t prepped properly will chip and peel regardless of how well the paint itself was applied.
Professional artists generally use airbrush paints formulated to flex with the helmet shell when it’s cold. A paint film that can’t flex will crack. Some artists use high-performance automotive hydrocarbon colour systems for their combination of flexibility and durability. Water-based acrylic airbrush paints, such as those from Createx or Wicked Colors, are also widely used and easier to clean up between colours.
Tamco Paint, a Canadian automotive paint brand, is referenced by a number of mask artists working in the hobby and professional space as a flexible, durable option suited to the curved surfaces and cold-weather conditions a goalie mask encounters.
The final clear coat is at least as important as the paint underneath it. A quality two-part automotive urethane clear, applied in multiple layers then water-sanded and machine-polished, produces the deep gloss finish you see on professional masks. It also acts as the primary barrier against the physical punishment a mask takes in game conditions. Skimping here shows up quickly.
Commissioning a custom mask is a back-and-forth process between the goalie and the artist. A few things happen in a predictable order:
Prices vary considerably depending on design complexity, the artist’s profile, and whether the shell itself is included. The figures below are approximate ranges from the North American hockey community and reflect CAD pricing. USD will differ.
Option | Approx. Cost (CAD) | Notes |
|---|---|---|
Vinyl wrap, DIY kit | $65 to $150 | Stock patterns; some installation skill required |
Professional vinyl wrap | $300 to $600 | Custom design possible; edges may lift over time |
Airbrush paint, simple design | $600 to $900 | Team colours, geometric or logo work |
Airbrush paint, mid-complexity | $900 to $1,500 | Character art, multi-panel themes, moderate portraiture |
Airbrush paint, high complexity | $1,500 to $2,500+ | Full photorealistic portraiture, NHL-level detail |
Worth knowing: NHL teams have a standard budget for mask painting, and it doesn’t always stretch to what a goalie actually wants. Some pay out of pocket for special-edition work, Stadium Series masks, Heritage Classic designs, anything where the level of detail runs past what the team covers. It comes up more often than you’d think when those masks start getting attention.
The designs we all still remember tend to do two things at once: they hit visually and they mean something personally. The themes that keep coming back tell you what goalies respond to. Fierce animals, eagles, wolves, lions, show up in every era. Skulls and skeletal imagery have been around since Bromley. Team heritage ties the mask to a place and a moment. Portrait tributes, family members, people who’ve passed, produce masks that carry weight in a way a clean logo design simply can’t replicate.
On the technical side, artists who do this professionally agree on one thing: the best designs work with the helmet’s geometry, not against it. You have to account for the high and low points of the shell, where the vent holes sit, how the cage frames everything. Put a portrait over a vent hole and it looks wrong. Load all the visual weight onto one side and the mask looks off-balance when the goalie’s moving. These aren’t huge decisions individually, but you can tell immediately when someone got them right versus when they didn’t.
Some goalies also carry the same design concept from team to team. Belfour’s eagle is the obvious example, four organizations, same bird. Potvin did it too. That kind of consistency turns a mask into something closer to a personal logo, which is a big part of why fans who watched those guys play decades ago can still picture the mask without being reminded.
Related: Browse the Mask Gallery for historical and contemporary design examples.
Standard work runs two to four weeks from the day the artist gets the shell. Complex portrait designs can push that to six or eight weeks. Rush orders are possible but cost more, and honestly, cutting cure time between layers is one of the things that shows up later when the clear coat starts failing early.
Most artists take send-ins. You ship the shell, they paint it and send it back. Some offer packages that include the shell if you’d rather start fresh. Just confirm your brand and model works for them before you ship anything, since some older shells need different prep than current production masks.
Depends what you need. Wraps have gotten genuinely good in recent years and come in at a lower price with faster turnaround. Paint gives you more depth, the ability to do real freehand work, and a finish that bonds with the shell rather than sitting on top of it. For competitive goalies and collectors, paint is the standard. For everyone else, a quality wrap is a perfectly solid choice.
Soft cloth, mild soap, nothing harsh. Solvents and acetone will go straight through the clear coat. Keep it out of direct sunlight when you’re storing it, and if you see a chip or scratch starting, get it touched up before it spreads. A well-coated mask holds up to real game use, but it’s still taking shots regularly, so it won’t last forever without some maintenance.
Yes, but go in with realistic expectations. Prep matters more than most beginners think: proper sanding, the right primer, and paint formulations that can flex in cold conditions. Standard craft acrylics aren’t built for a mask that sees ice time. Practice on a broken or spare shell first, and keep the design simple on the first attempt rather than going straight for detailed portraiture.
Ask ten people and you’ll get a few different answers depending on their era. Cheevers’ stitches come up most often as the design that started everything. Gratton’s tiger, Dryden’s target, and Belfour’s eagle all get mentioned regularly. If we’re talking pure name recognition across generations of fans, it’s still Cheevers.
Disclaimer
We run this site as an independent educational resource about goalie mask airbrush art. We’re not affiliated with, endorsed by, or associated with the NHL, the NHLPA, any NHL team, Hockey Canada, the IIHF, or any individual artist or mask manufacturer. When we reference player names and historical facts, we do so for informational purposes only.
All trademarks remain the property of their respective owners. The prices and turnaround times we mention are approximate figures drawn from community sources and can vary quite a bit in practice. If you’re planning a commission, always reach out to the artist directly for current pricing and availability.